放假在家,总是无所事事,就会拿着手机玩王者荣耀,但是人上年纪后,反应就是慢,游戏玩得菜得不得了。所以今天想着做点稍微有意义的事情-学习一下uView,学习总是要有一个目标才会有动力,就想着要不做一个图片浏览的小程序吧。
在开始之前,我们需要准备好环境Nodejs和HBuilderX,另外还需要一个小程序开发工具,微信、支付宝、头条等,自己任选吧,这里我选择的是头条,具体安装步骤在这里就省略掉,因为百度搜索里面太多太多了,这里就假设我们都已经具备开发环境了。
使用HBuilderX新建一个项目,为了方便,我直接新建了一个uviewui模板的项目,
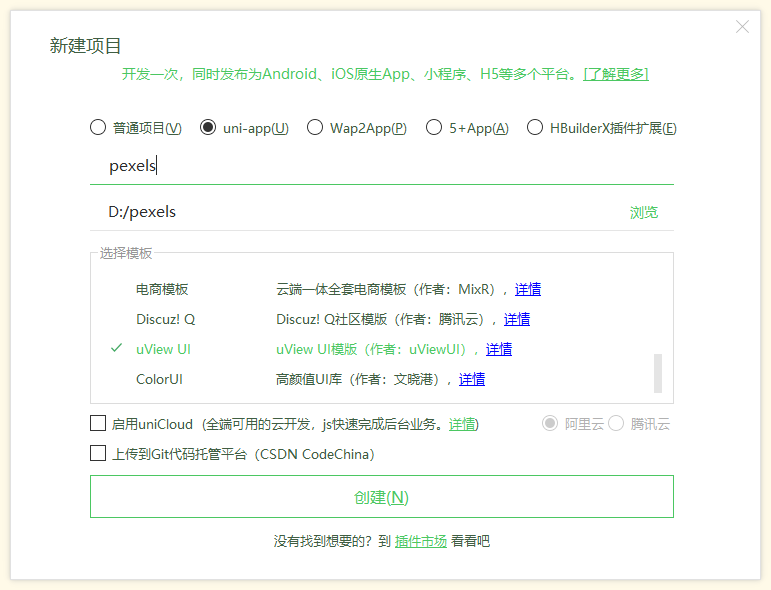
这种方式创建的项目,会把uviewui的很多没用的Demo也引入进入,如过不需要的话,可以删除掉

接下来,我们需要安装scss/sass的插件,否则,在编译工程的时候会提示预编译器错误:代码使用了scss/sass语言,但未安装相应的编译器插件,请前往插件市场安装该插件
我们在HBuilderX->工具->插件安装->去往插件市场安装,去安装


安装成功后,我们把项目运行起来后,我们用头条小程序开发工具把dist下面的文件夹导进去


这里我新建一个Vue的页面,叫index.vue,这里的布局代码是我去uView的waterfall中拷贝出来稍作了修改,另外,我们需要去pexels申请一个API KEY,这个key需要在每次请求时放在请求头里面,所以,我们需要加入到http.interceptor.js中
Vue.prototype.$u.http.interceptor.request = (config) => {
		config.header.Authorization= '563492ad6f9170000100000130ba6c4153414dd4973ce4e87cb6d9c9';
		return config;
	}
另外,我们需要修改一下response,因为pexels接口返回的数据格式中没code这个属性
Vue.prototype.$u.http.interceptor.response = (res) => {
		// 如果把originalData设置为了true,这里得到将会是服务器返回的所有的原始数据
		// 判断可能变成了res.statueCode,或者res.data.code之类的,请打印查看结果
		// console.log(res);
		// if(res.code == 200) {
		// 	// 如果把originalData设置为了true,这里return回什么,this.$u.post的then回调中就会得到什么
		// 	return res.data;
		// } else return false;
		return res;
	}
下面是完整代码
<template>
	<view class="wrap">
		<view class="u-waterfall">
			<view id="u-left-column" class="u-column">
				<view v-for="(item, index) in leftList" class="warter" @tap="ViewImage" :data-url="item.src.large"><u-lazy-load threshold="-450"   border-radius="10" :image="item.src.medium" :index="index"></u-lazy-load><view class="photographer">作者:{{ item.photographer }}</view></view>
			</view>
			<view id="u-right-column" class="u-column">
				<view v-for="(item, index) in rightList" class="warter" @tap="ViewImage" :data-url="item.src.large"><u-lazy-load threshold="-450"   border-radius="10" :image="item.src.medium" :index="index"></u-lazy-load><view class="photographer">作者:{{ item.photographer }}</view></view>
			</view>
		</view>
		<u-loadmore bg-color="rgb(240, 240, 240)" :status="loadStatus" @loadmore="loadPexels"></u-loadmore>
	</view>
</template>

<script>
	export default {
		data() {
			return {
				loadStatus: 'loadmore',
				leftList: [],
				rightList: [],
				allList:[],
				tempList:[],
				pageIndex:1
			}
		},
		onLoad() {
			this.loadPexels();
		},
		onReachBottom() {
			this.loadStatus = 'loading';
			this.pageIndex++;
			// 模拟数据加载
			setTimeout(() => {
				this.loadPexels();
				this.loadStatus = 'loadmore';
			}, 1000)
		},
		methods: {
			loadPexels() {
				let that=this;
				that.$u.get(`https://api.pexels.com/v1/curated?page=${that.pageIndex}&per_page=40`).then(res => {
								that.tempList=res.photos;
								that.splitData();
							}).catch(ex=>{
							});
			},
			ViewImage(e) {
				let that=this;
							uni.previewImage({
								urls: that.allList,
								current: e.currentTarget.dataset.url
							});
						},
			async splitData() {
				if (!this.tempList.length) return;
				let leftRect = await this.$uGetRect('#u-left-column');
				let rightRect = await this.$uGetRect('#u-right-column');
				// 如果左边小于或等于右边,就添加到左边,否则添加到右边
				let item = this.tempList[0];
				// 解决多次快速上拉后,可能数据会乱的问题,因为经过上面的两个await节点查询阻塞一定时间,加上后面的定时器干扰
				// 数组可能变成[],导致此item值可能为undefined
				if(!item) return ;
				this.allList.push(item.src.large);
				if (leftRect.height < rightRect.height) {
					this.leftList.push(item);
				} else if (leftRect.height > rightRect.height) {
					this.rightList.push(item);
				} else {
					// 这里是为了保证第一和第二张添加时,左右都能有内容
					// 因为添加第一张,实际队列的高度可能还是0,这时需要根据队列元素长度判断下一个该放哪边
					if (this.leftList.length <= this.rightList.length) {
						this.leftList.push(item);
					} else {
						this.rightList.push(item);
					}
				}
				// 移除临时列表的第一项
				this.tempList.splice(0, 1);
				// 如果临时数组还有数据,继续循环
				if (this.tempList.length) {
					setTimeout(() => {
						this.splitData();
					}, this.addTime)
				}
			},
			remove(id) {
				this.$refs.uWaterfall.remove(id);
			},
			clear() {
				this.$refs.uWaterfall.clear();
			}
		}
	}
</script>

<style>
	/* page不能写带scope的style标签中,否则无效 */
	page {
		background-color: rgb(240, 240, 240);
	}
</style>

<style lang="scss" scoped>
	.warter {
		border-radius: 8px;
		margin: 2px;
		background-color: #ffffff;
		padding: 8px;
		position: relative;
	}
	.photographer {
	font-size: 30rpx;
	margin-top: 5px;
	color: $u-main-color;
	word-break: break-all;
}
	.u-waterfall {
		display: flex;
		flex-direction: row;
		align-items: flex-start;
	}

	.u-column {
		display: flex;
		flex: 1;
		flex-direction: column;
		height: auto;
	}

	.u-image {
		width: 100%;
	}
</style>
准备就绪后,还剩最后一步,去page.json注册我们的页面的
{
			"path": "pages/img/index",
			"style": {
				"navigationBarTitleText": "Pexels图片"
			}
		}
我们来看看效果

