最近有个新东西要做,就是使用微信公众号推送消息,大致的需求就是要实现多公众号消息推送,并且要知道消息最终有没有推送成功,我们需要去查阅一下官方的模板消息接口文档,在文档中我们可以看到,在调用推送接口会,会有一个回调事件来告诉我们此次消息是否推送成功,那么这就好办了,下来我们就燥起来吧。
这里我涉及到工具包和环境如下:
- JDK1.8
- Spring Boot 2.3.3
- Win10
- IDEA 2020.2.1
- lombok 1.18.12
- springfox-boot-starter 3.0.0
- weixin-java-mp 3.9.0
好了,我进入我们的主题吧,新建一个Spring Boot的项目,并引入上面的这些包
	<!-- https://mvnrepository.com/artifact/com.github.binarywang/weixin-java-cp -->
		<dependency>
			<groupId>com.github.binarywang</groupId>
			<artifactId>weixin-java-mp</artifactId>
			<version>3.9.0</version>
		</dependency>
        <!-- https://mvnrepository.com/artifact/io.springfox/springfox-boot-starter -->
		<dependency>
			<groupId>io.springfox</groupId>
			<artifactId>springfox-boot-starter</artifactId>
			<version>3.0.0</version>
		</dependency>
        <!-- lombok -->
		<dependency>
			<groupId>org.projectlombok</groupId>
			<artifactId>lombok</artifactId>
			<optional>true</optional>
		</dependency>
这里我们直接使用weixin-java-mpgithub上的多公众号示例,
先创建个名为JsonUtils的utils类:
import com.fasterxml.jackson.annotation.JsonInclude.Include;
import com.fasterxml.jackson.core.JsonProcessingException;
import com.fasterxml.jackson.databind.ObjectMapper;
import com.fasterxml.jackson.databind.SerializationFeature;

public class JsonUtils {
    private static final ObjectMapper JSON = new ObjectMapper();

    static {
        JSON.setSerializationInclusion(Include.NON_NULL);
        JSON.configure(SerializationFeature.INDENT_OUTPUT, Boolean.TRUE);
    }

    public static String toJson(Object obj) {
        try {
            return JSON.writeValueAsString(obj);
        } catch (JsonProcessingException e) {
            e.printStackTrace();
        }

        return null;
    }
}
继续再分别新建两个名为WxMpProperties和WxMpConfiguration的Configuration类:
import lombok.Data;
import org.springframework.boot.context.properties.ConfigurationProperties;

import java.util.List;

@Data
@ConfigurationProperties(prefix = "wx.mp")
public class WxMpProperties {
    /**
     * 是否使用redis存储access token
     */
    private boolean useRedis;

    /**
     * redis 配置
     */
    private RedisConfig redisConfig;

    @Data
    public static class RedisConfig {
        /**
         * redis服务器 主机地址
         */
        private String host;

        /**
         * redis服务器 端口号
         */
        private Integer port;
    }

    /**
     * 多个公众号配置信息
     */
    private List<MpConfig> configs;

    @Data
    public static class MpConfig {
        /**
         * 设置微信公众号的appid
         */
        private String appId;

        /**
         * 设置微信公众号的app secret
         */
        private String secret;

        /**
         * 设置微信公众号的token
         */
        private String token;

        /**
         * 设置微信公众号的EncodingAESKey
         */
        private String aesKey;
    }

    @Override
    public String toString() {
        return JsonUtils.toJson(this);
    }
}


@AllArgsConstructor
@Configuration
@EnableConfigurationProperties(WxMpProperties.class)
public class WxMpConfiguration {
    private final LogHandler logHandler;
    private final MsgHandler msgHandler;
    private final WxMpProperties properties;

    @Bean
    public WxMpService wxMpService() {

        final List<WxMpProperties.MpConfig> configs = this.properties.getConfigs();
        if (configs == null) {
            throw new RuntimeException("大哥,拜托先看下项目首页的说明(readme文件),添加下相关配置,注意别配错了!");
        }

        WxMpService service = new WxMpServiceImpl();
        service.setMultiConfigStorages(configs
                .stream().map(a -> {
                    WxMpDefaultConfigImpl configStorage;
                    if (this.properties.isUseRedis()) {
                        final WxMpProperties.RedisConfig redisConfig = this.properties.getRedisConfig();
                        JedisPool jedisPool = new JedisPool(redisConfig.getHost(), redisConfig.getPort());
                        configStorage = new WxMpRedisConfigImpl(new JedisWxRedisOps(jedisPool), a.getAppId());
                    } else {
                        configStorage = new WxMpDefaultConfigImpl();
                    }

                    configStorage.setAppId(a.getAppId());
                    configStorage.setSecret(a.getSecret());
                    configStorage.setToken(a.getToken());
                    configStorage.setAesKey(a.getAesKey());
                    return configStorage;
                }).collect(Collectors.toMap(WxMpDefaultConfigImpl::getAppId, a -> a, (o, n) -> o)));
        return service;
    }

    @Bean
    public WxMpMessageRouter messageRouter(WxMpService wxMpService) {
        final WxMpMessageRouter newRouter = new WxMpMessageRouter(wxMpService);

        // 记录所有事件的日志 (异步执行)
        newRouter.rule().handler(this.logHandler).next();

        // 默认
        newRouter.rule().async(false).handler(this.msgHandler).end();

        return newRouter;
    }

}
按照weixin-java-mp我们还需要新建handler和builder,我就一一复制出来了,我们继续其他的吧,去配置文件把微信公众号配置好,这里我用的是测试公众号,如果你们也需要的话,可以去https://mp.weixin.qq.com/debug/cgi-bin/sandboxinfo?action=showinfo&t=sandbox/index申请,很简单,就微信扫一扫即可,我登录后就出现这样的界面
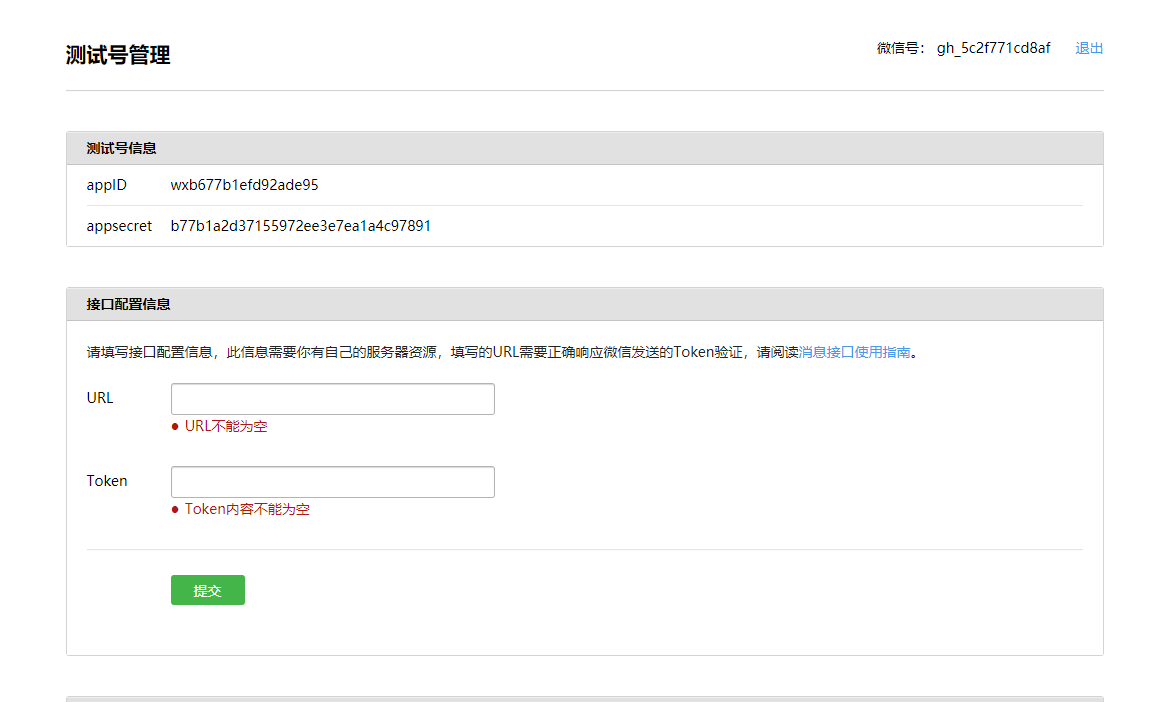
现在就得到了我们的AppId和appsecret了,然后去配置文件中配置好
wx:
  mp:
    useRedis: false
    redisConfig:
      host: xxx.xx.xxx.xxx
      port: 6379
    configs:
      - appId: xxxxxxxxxxxxxxxx # 第一个公众号的appid
        secret: xxxxxxxxxxxxxxxxxxxxxxxxxxxxx # 公众号的appsecret
        token: xxxxxx # 接口配置里的Token值
        aesKey: 111 # 接口配置里的EncodingAESKey值
      - appId: wxb677b1efd92ade95 # 第一个公众号的appid
        secret: b77b1a2d37155972ee3e7ea1a4c97891 # 公众号的appsecret
        token: okwechat # 接口配置里的Token值
        aesKey: 111 # 接口配置里的EncodingAESKey值
现在我们就来实现消息发送吧,借助weixin-java-mp来实现消息推送真的是方便,我新建了分别新建了一个IWechatMsgPushService和WechatMsgPushServiceImpl
public interface IWechatMsgPushService {
    /**
     * 发送微信消息
     * @param openId
     * @return
     */
    Boolean sendWxTemplateMsg(String appId,String openId);
}

@Slf4j
@Service
public class WechatMsgPushServiceImpl implements IWechatMsgPushService {

    @Autowired
    WxMpService wxMpService;

    @Override
    public Boolean sendWxTemplateMsg(String appId,String openId) {
        // 发送模板消息接口
        WxMpTemplateMessage templateMessage = WxMpTemplateMessage.builder()
                // 接收者openid
                .toUser(openId)
                // 模板id
                .templateId("suUhCCo9owmD8QYbdcSgmG3uXwPsDE1Wn8eKThztS7U")
                // 模板跳转链接
                .url("http://www.qq.com")
                .build();
        // 添加模板数据
        templateMessage.addData(new WxMpTemplateData("first", "这是模版消息", "#FF00FF"))
                .addData(new WxMpTemplateData("keyword1", "这是模版消息", "#A9A9A9"))
                .addData(new WxMpTemplateData("keyword2", "这是模版消息", "#FF0000"))
                .addData(new WxMpTemplateData("keyword3", "这是模版消息", "#FF00FF"))
                .addData(new WxMpTemplateData("keyword4", "这是模版消息", "#FF00BB"))
                .addData(new WxMpTemplateData("remark", "这是模版消息", "#000000"));
        String msgId = null;
        try {
            //根据appId切换公众号
            wxMpService.switchover(appId);
            // 发送模板消息
            msgId = wxMpService.getTemplateMsgService().sendTemplateMsg(templateMessage);
        } catch (WxErrorException e) {
            e.printStackTrace();
        }
        return msgId != null;
    }
}
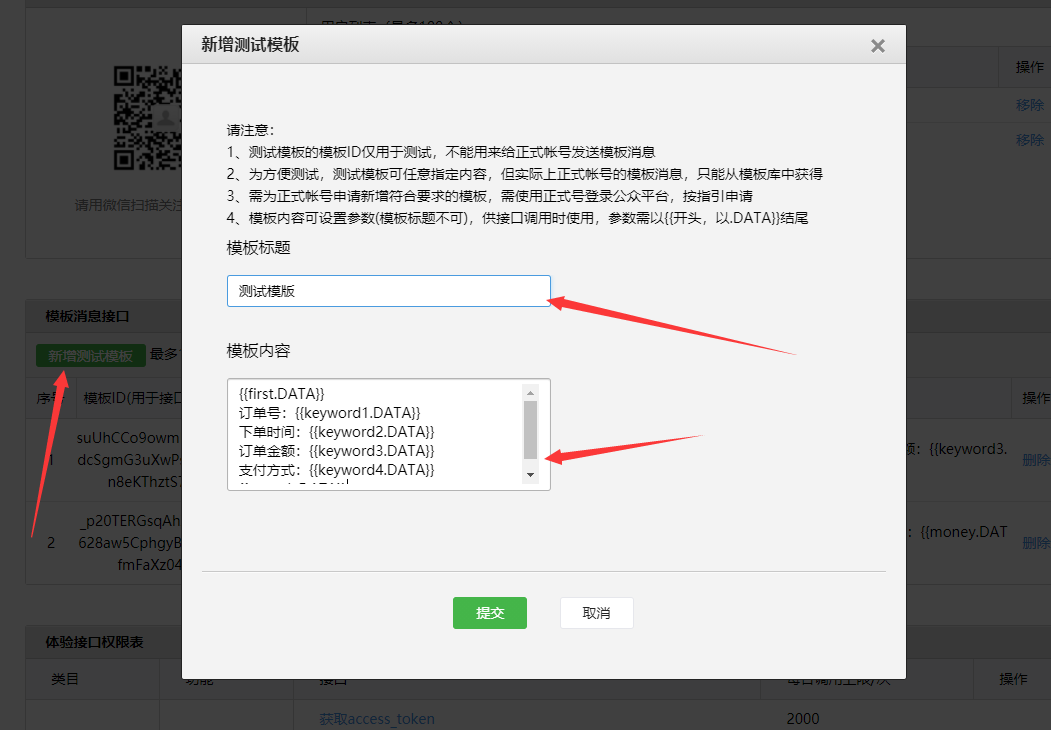
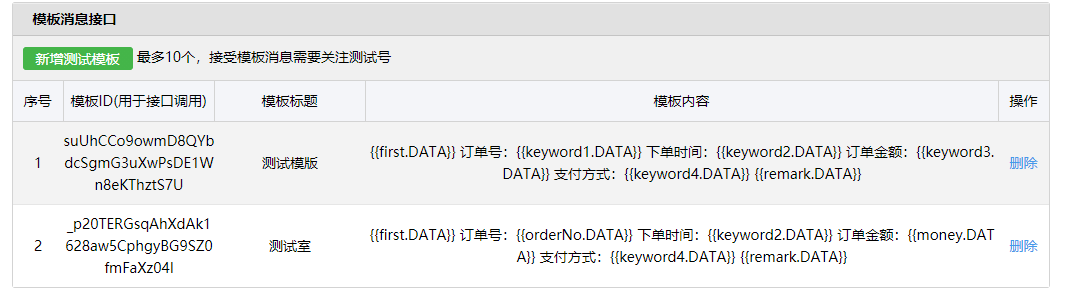
这里的templateId需要我们去手动创建一个
如果是一个公众号的话,就不需要 wxMpService.switchover(appId);,否则会报错,因为它不知道你是要调用哪个公众号。
现在就新建一个Controller
@Slf4j
@AllArgsConstructor
@RestController
@RequestMapping("/wx/push/{appid}")
@Api(tags = "微信信息推送")
public class WxMsgPushController {

    @Autowired
    IWechatMsgPushService msgPushService;

    /**
     * 发送微信模板消息
     */
    @ApiOperation("发送微信模板消息")
    @PostMapping("/sendWxMsg")
    public ResponseEntity sendWxInfo(@PathVariable("appid") String appId, String openId) {

        Boolean aBoolean = msgPushService.sendWxTemplateMsg(appId,openId);
        return ResponseEntity.ok().build();
    }
}
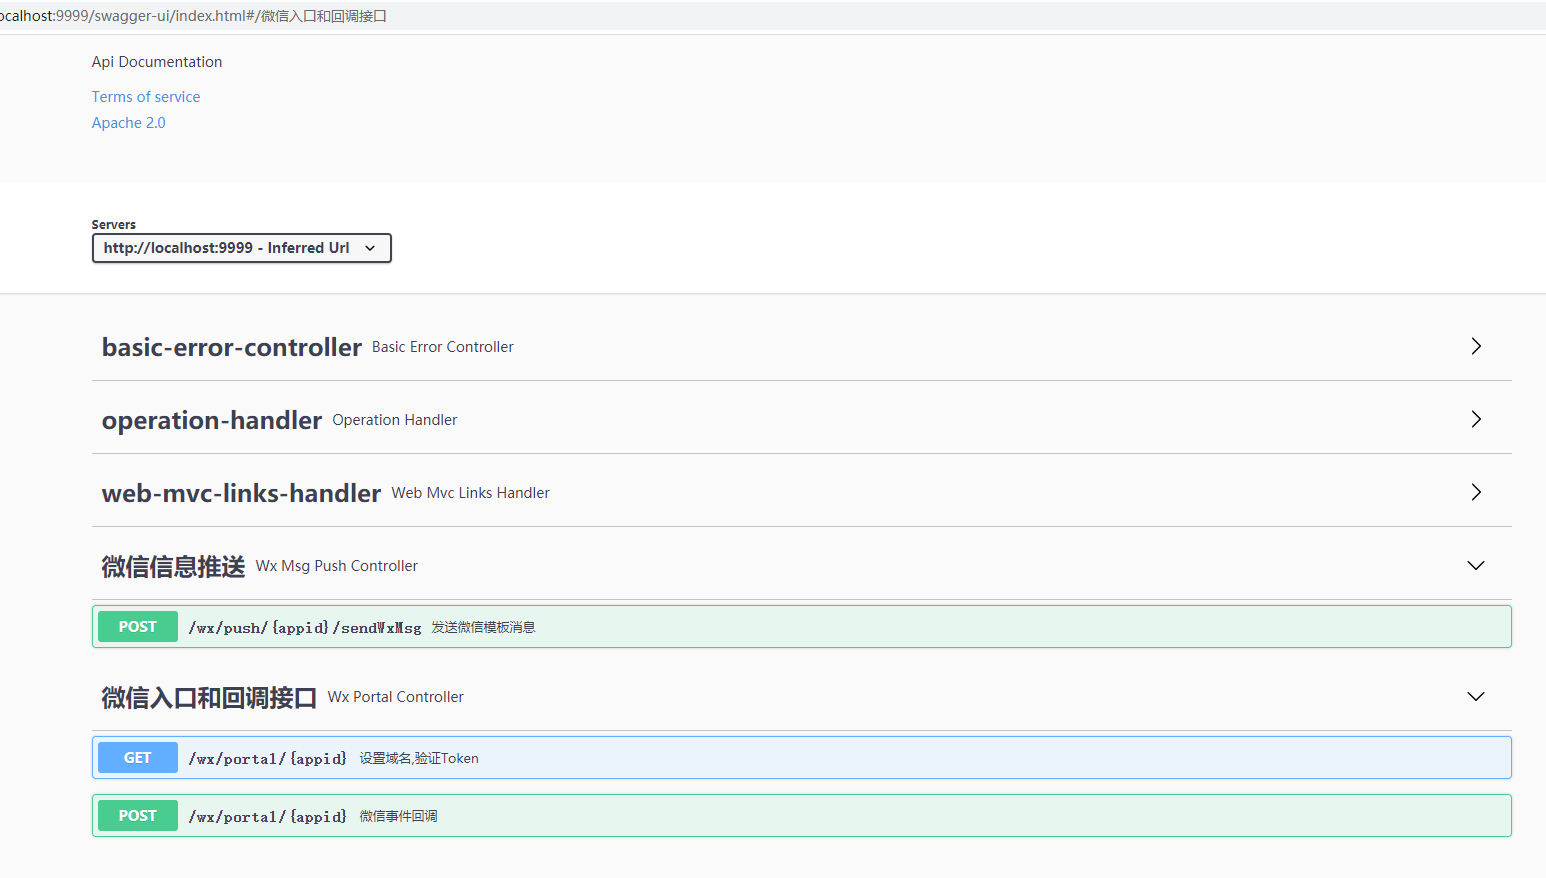
因为我们使用的springfox-boot-starter,它已经默认为我们做了一些配置,所以,我们直接运行就可以访问Swagger*
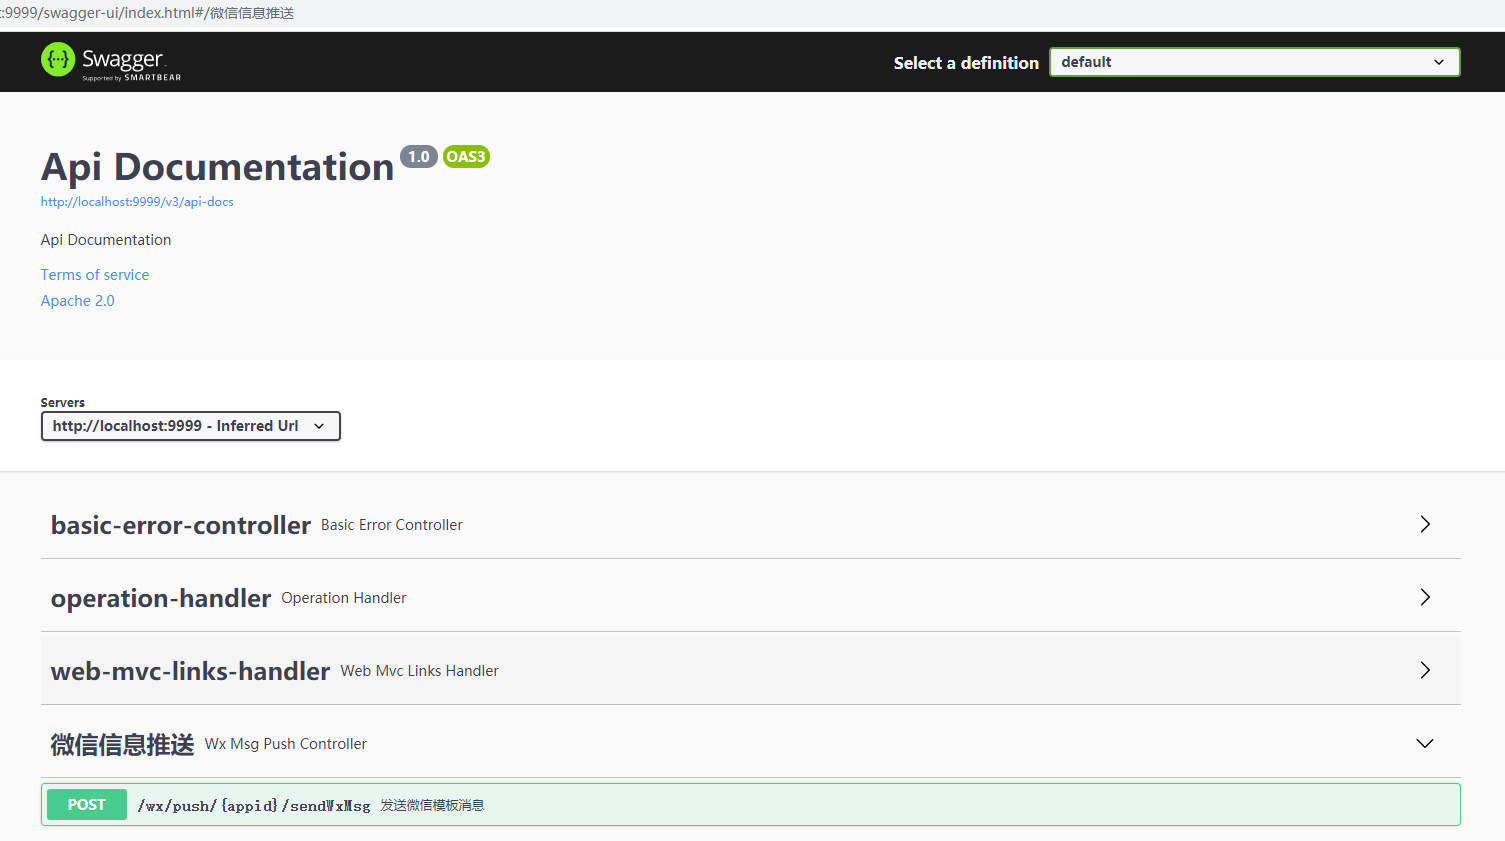
这里需要注意的是,新版的springfox访问路径有些变化,现在要访问swagger-ui/index.html,我们来发条测试消息试试


这里的OpenId可以直接在测试公众号后台获取,那么消息推送就差不多了,现在我们来看看事件回调。我们继续搬Demo的代码,新建一个WxPortalController,代码如下:
@Slf4j
@AllArgsConstructor
@RestController
@RequestMapping("/wx/portal/{appid}")
@Api(tags = "微信入口和回调接口")
public class WxPortalController {

    private final WxMpService wxService;
    private final WxMpMessageRouter messageRouter;

    @ApiOperation("设置域名,验证Token")
    @GetMapping(produces = "text/plain;charset=utf-8")
    public String authGet(@PathVariable String appid,
                          @RequestParam(name = "signature", required = false) String signature,
                          @RequestParam(name = "timestamp", required = false) String timestamp,
                          @RequestParam(name = "nonce", required = false) String nonce,
                          @RequestParam(name = "echostr", required = false) String echostr) {

        log.info("\n接收到来自微信服务器的认证消息:[{}, {}, {}, {}]", signature,
                timestamp, nonce, echostr);
        if (StringUtils.isAnyBlank(signature, timestamp, nonce, echostr)) {
            throw new IllegalArgumentException("请求参数非法,请核实!");
        }

        if (!this.wxService.switchover(appid)) {
            throw new IllegalArgumentException(String.format("未找到对应appid=[%s]的配置,请核实!", appid));
        }

        if (wxService.checkSignature(timestamp, nonce, signature)) {
            return echostr;
        }

        return "非法请求";
    }

    @ApiOperation("微信事件回调")
    @PostMapping(produces = "application/xml; charset=UTF-8")
    public String post(@PathVariable String appid,
                       @RequestBody String requestBody,
                       @RequestParam("signature") String signature,
                       @RequestParam("timestamp") String timestamp,
                       @RequestParam("nonce") String nonce,
                       @RequestParam("openid") String openid,
                       @RequestParam(name = "encrypt_type", required = false) String encType,
                       @RequestParam(name = "msg_signature", required = false) String msgSignature) {
        log.info("\n接收微信请求:[openid=[{}], [signature=[{}], encType=[{}], msgSignature=[{}],"
                        + " timestamp=[{}], nonce=[{}], requestBody=[\n{}\n] ",
                openid, signature, encType, msgSignature, timestamp, nonce, requestBody);

        if (!this.wxService.switchover(appid)) {
            throw new IllegalArgumentException(String.format("未找到对应appid=[%s]的配置,请核实!", appid));
        }

        if (!wxService.checkSignature(timestamp, nonce, signature)) {
            throw new IllegalArgumentException("非法请求,可能属于伪造的请求!");
        }

        String out = null;
        if (encType == null) {
            // 明文传输的消息
            WxMpXmlMessage inMessage = WxMpXmlMessage.fromXml(requestBody);
            WxMpXmlOutMessage outMessage = this.route(inMessage);
            if (outMessage == null) {
                return "";
            }

            out = outMessage.toXml();
        } else if ("aes".equalsIgnoreCase(encType)) {
            // aes加密的消息
            WxMpXmlMessage inMessage = WxMpXmlMessage.fromEncryptedXml(requestBody, wxService.getWxMpConfigStorage(),
                    timestamp, nonce, msgSignature);
            log.debug("\n消息解密后内容为:\n{} ", inMessage.toString());
            WxMpXmlOutMessage outMessage = this.route(inMessage);
            if (outMessage == null) {
                return "";
            }

            out = outMessage.toEncryptedXml(wxService.getWxMpConfigStorage());
        }

        log.debug("\n组装回复信息:{}", out);
        return out;
    }

    private WxMpXmlOutMessage route(WxMpXmlMessage message) {
        try {
            return this.messageRouter.route(message);
        } catch (Exception e) {
            log.error("路由消息时出现异常!", e);
        }

        return null;
    }
}
我们再启动起来,可以在swagger中看到新的接口
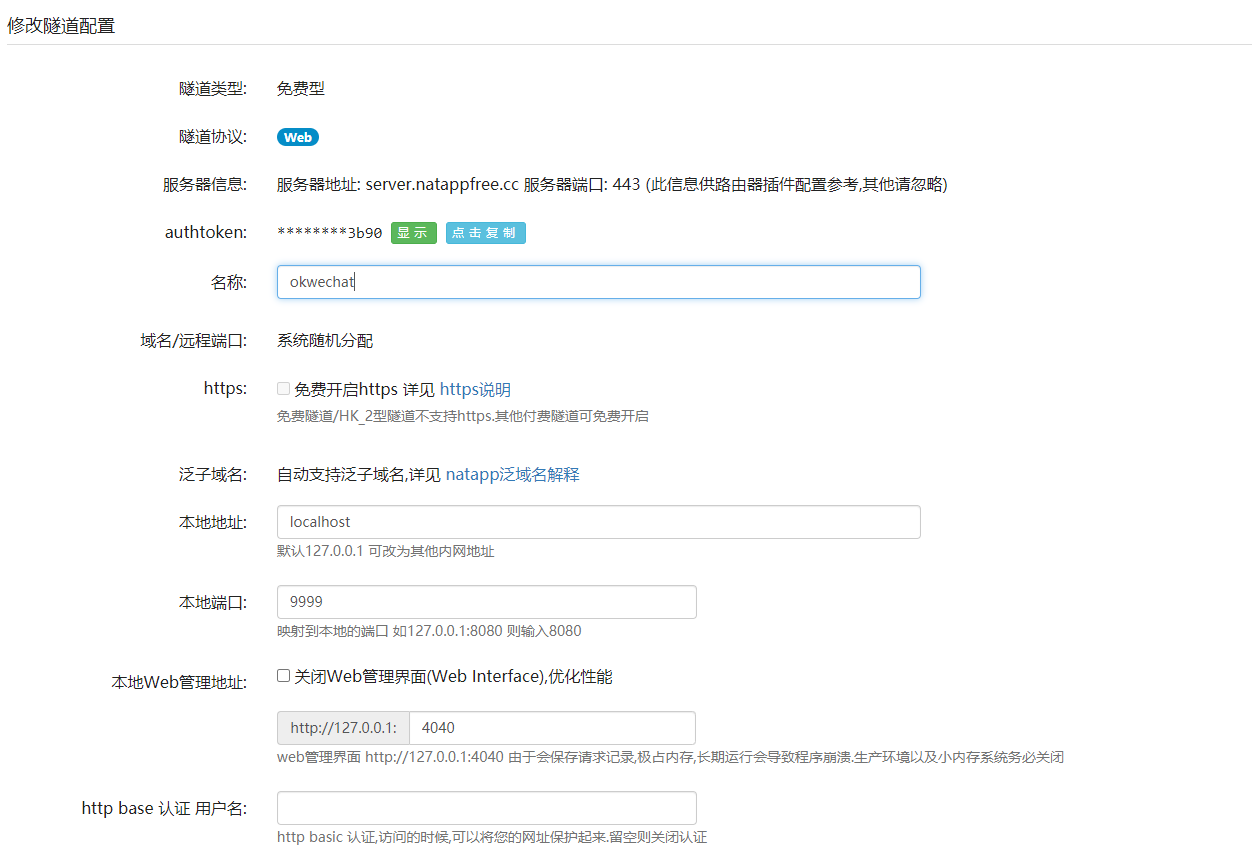
现在我们就开始去配置回调地址了,因为我们本地启动起来外网是访问不到的,所以需要做内网穿透,这里我推荐两个比较常用的内网穿透软件natapp和ngrok,之前ngrok有免费的,但是不是很稳定,现在我用的natapp,因为他有免费的通道使用,只是免费版带宽只有1M,也不支持HTTPS和绑定域名,不过对我来说已经够用,因为只是测试嘛,我的natapp配置如下
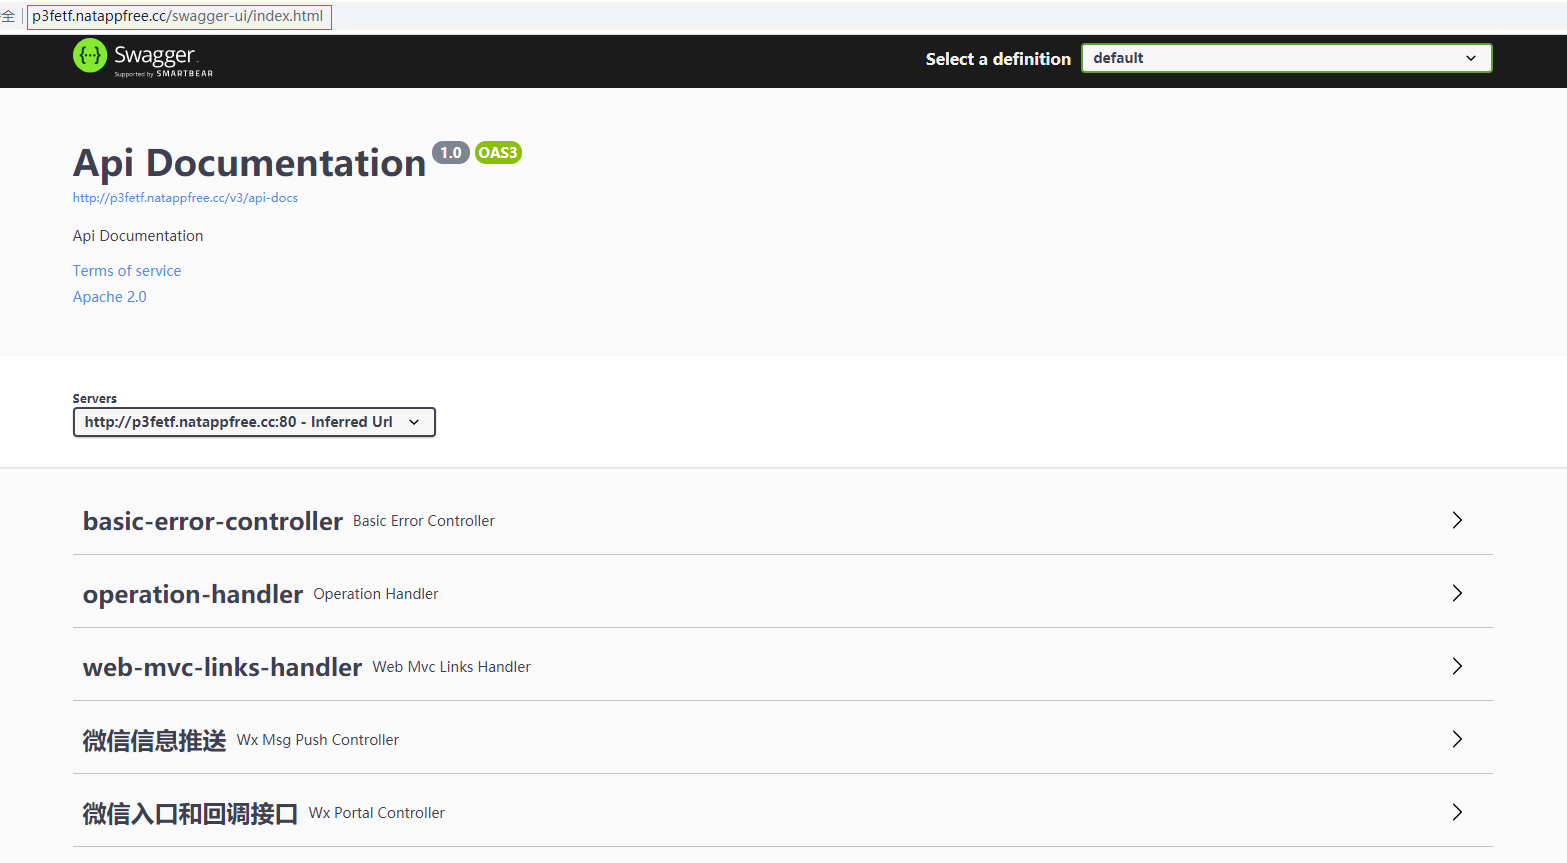
然后,需要natapp来启动,启动成功后会出现如下界面

现在我们就可以通过互联网来访问我们的接口了
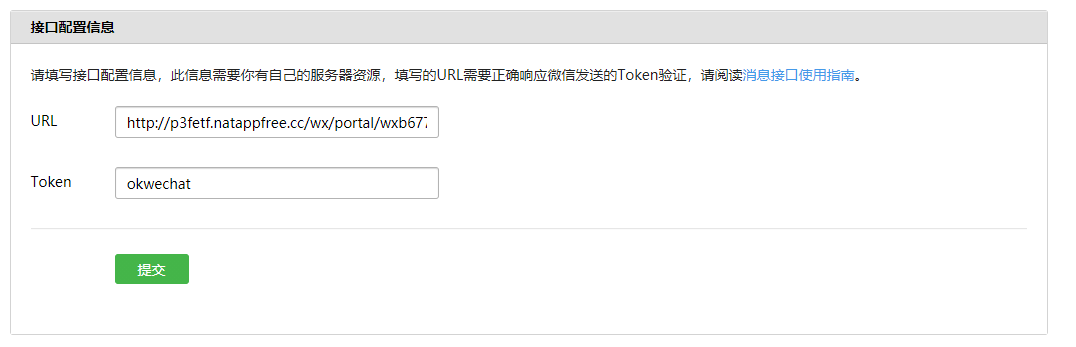
现在,我们就去测试公众号配置回调地址

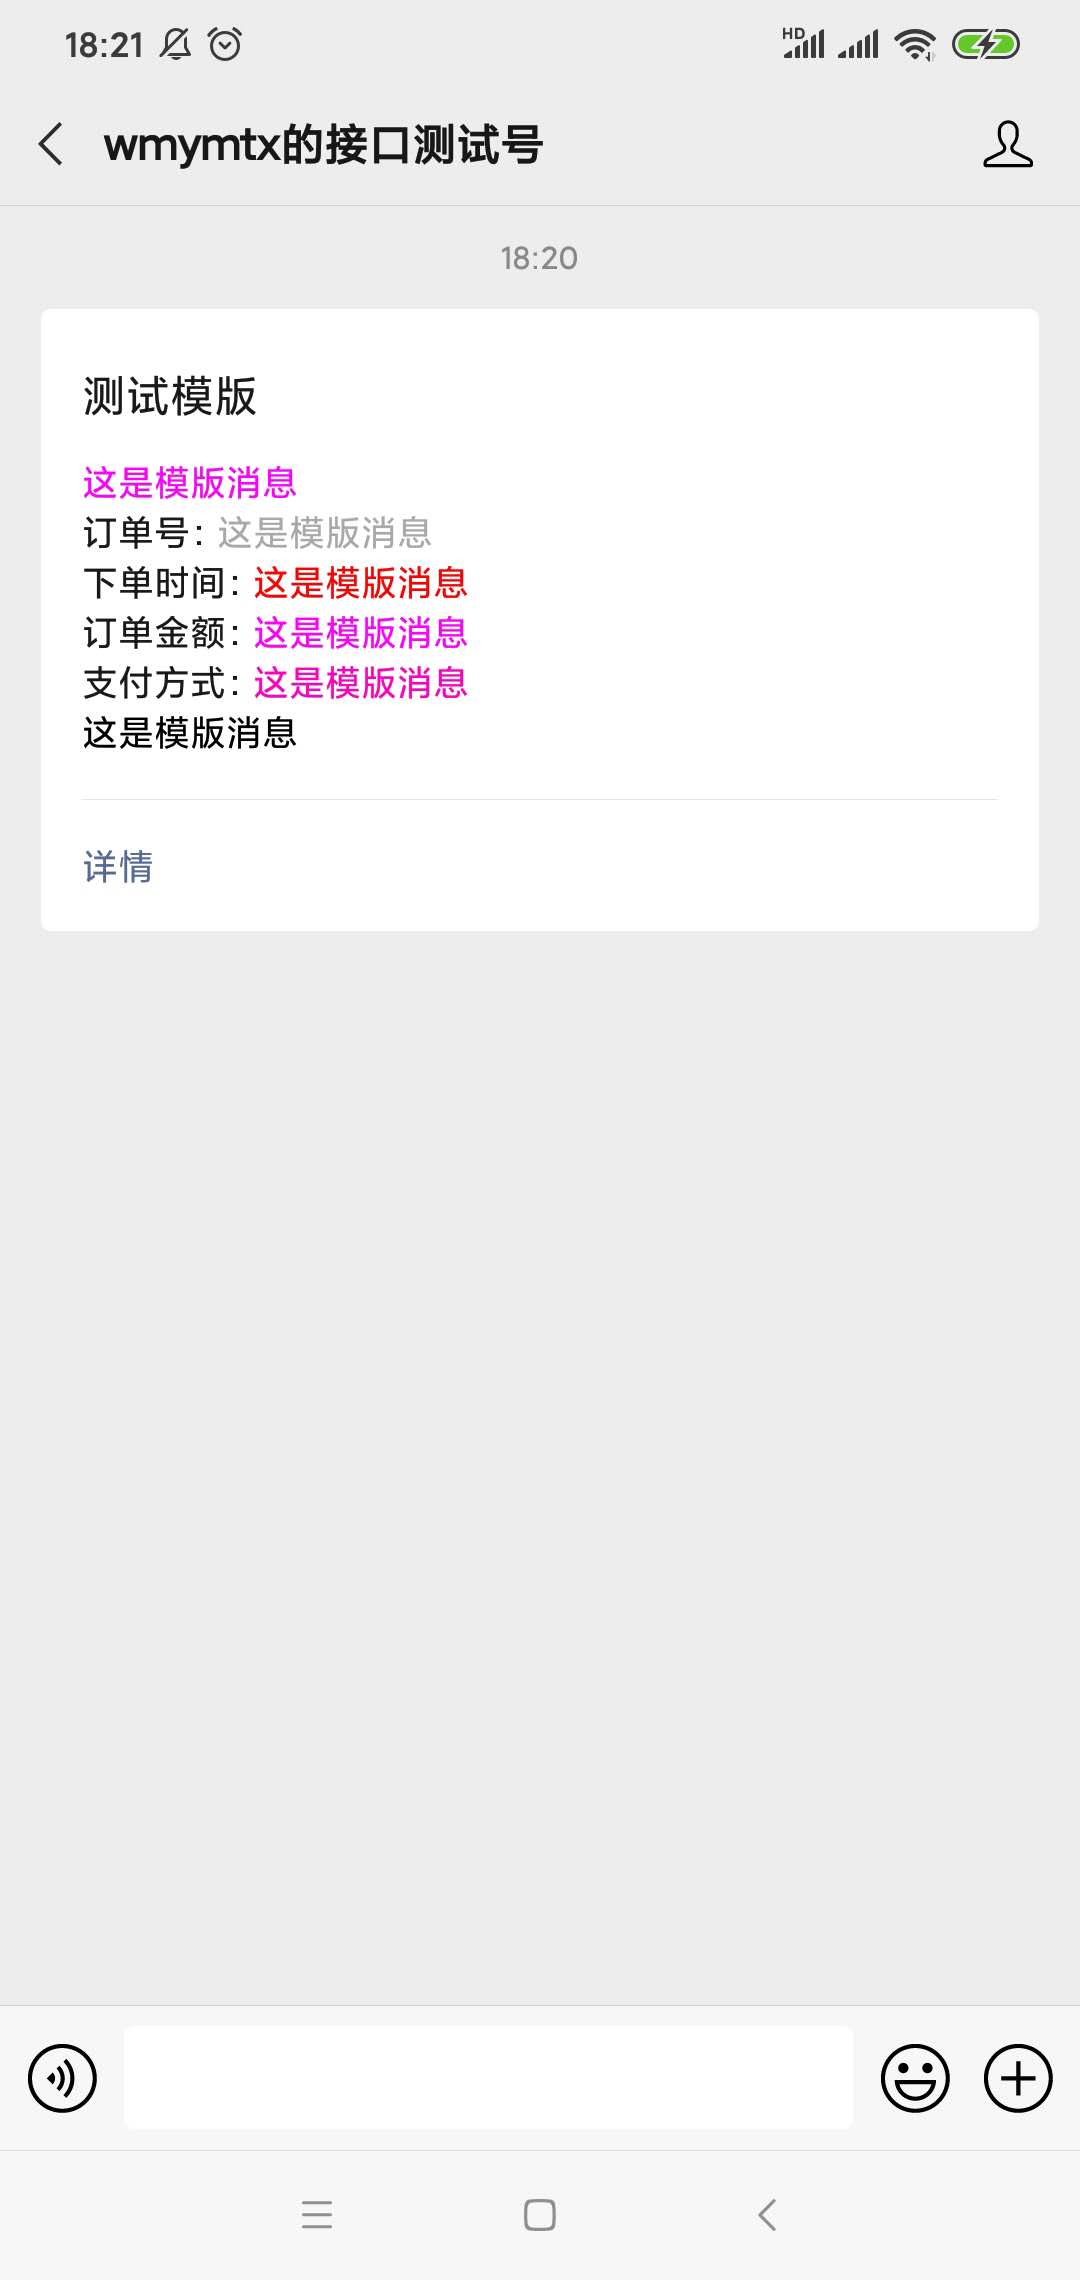
回调地址已经配置完成,我们再重新推送一次模版消息看看效果
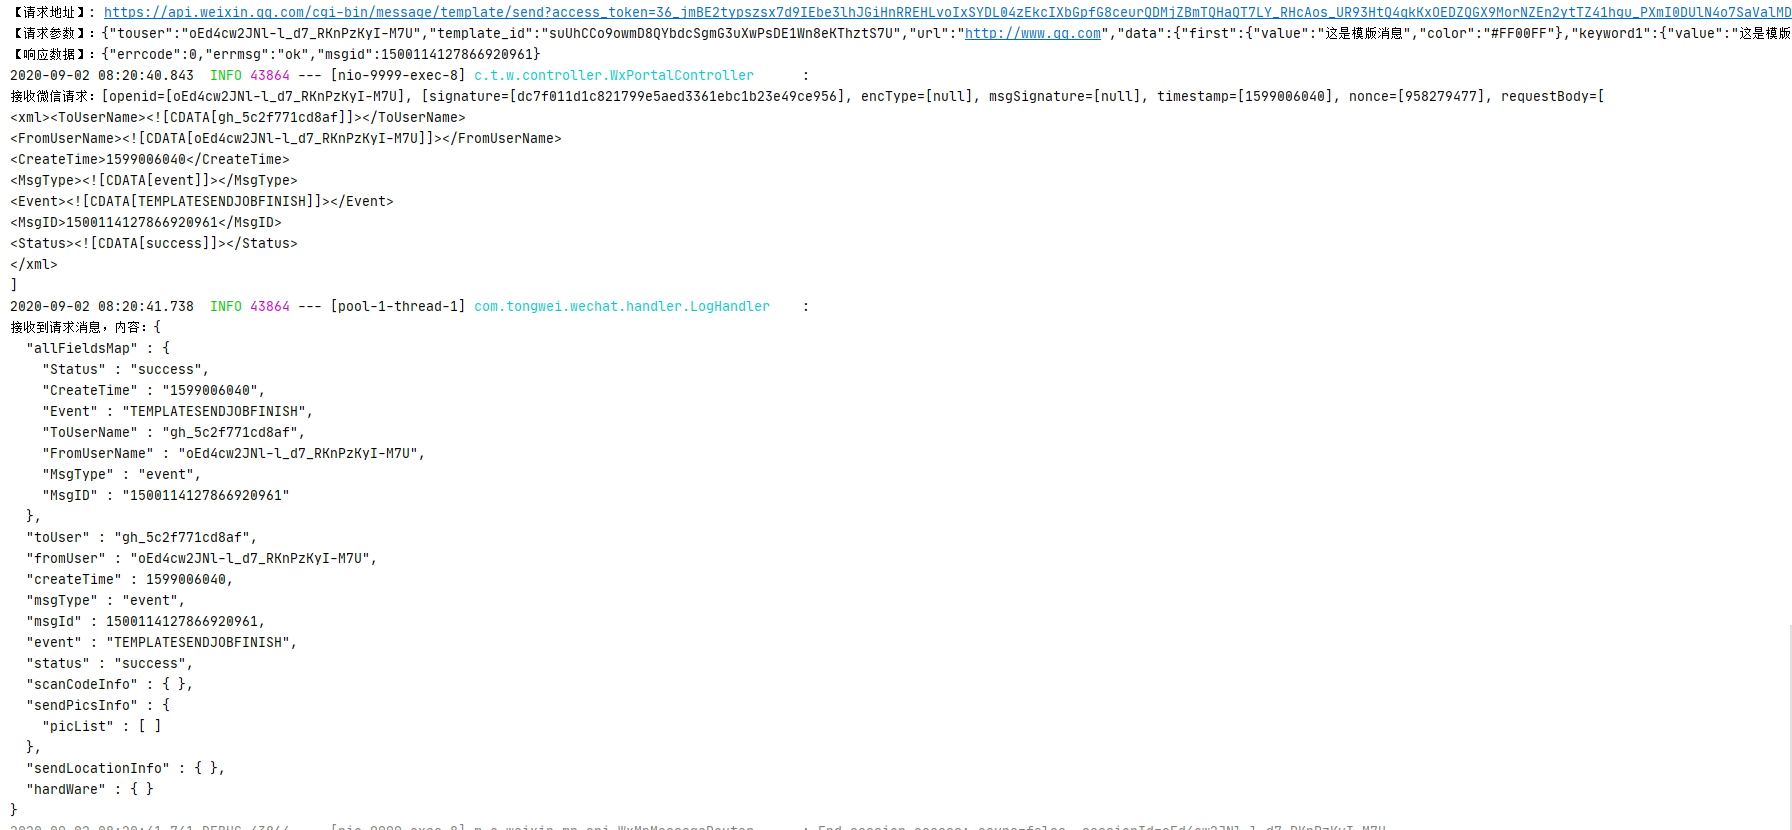
在我们实践过程中得知,在调用发送模版接口的时候,会返回一个msgid,在回调事件中也会返回msgid,现在我们就可以通过msgid来关联之前发送的消息,从而得知该模版消息的最终推送状态。
我只是记录我的学习过程,由于书读得少,可能很多地方表述或者是理解得不对,请轻喷并指正。